How to Grow Peas: The Complete Guide from Seed to Harvest
Learning how to grow peas is one of the most pleasurable entry points into spring vegetable gardening, and one of the most rewarding for a very simple reason: nothing sold in a store comes close to the sweetness of a pea eaten within minutes of being picked.
The moment a pea is harvested, its sugars begin converting to starch, which is why store-bought and even frozen peas can never quite match the experience of homegrown ones eaten straight from the vine.
Peas are also one of the easiest crops for a beginner, as learning how to grow peas for the first time is quite simple.
The seeds are direct sown, tolerate cool soil and light frost without complaint, need very little feeding because they make their own nitrogen, and reward a modest amount of space with a genuinely delicious harvest.
This complete guide covers everything you need to know about how to grow peas - choosing between the three main types, timing your sowings correctly, trellising, watering, and harvesting at exactly the right moment for peak flavor.
The National Garden Bureau named 2025 the Year of the Pea, and University of Missouri Extension horticulturist David Trinklein notes that when given an early start, growing peas is genuinely easy, since this cool-season crop tolerates light frost and germinates well even in relatively cool soil.
Source: University of Missouri Extension - 2025 is the Year of the Pea
The Three Types of Peas to Grow

Before getting into the practical steps of how to grow peas, it helps to understand the three distinct types available, since they are used very differently in the kitchen even though they are grown in almost exactly the same way.
Shelling peas, also called garden peas or English peas, are the classic type where the pod itself is tough and inedible and only the round peas inside are eaten. These are the peas of childhood memory - shelled from their pods and eaten raw or cooked, intensely sweet when picked at the right moment. Shelling peas are the best choice if your primary goal in growing peas is the traditional sweet pea flavor on its own.
Snow peas produce flat, thin, completely edible pods that are harvested while the seeds inside are still tiny and immature. The whole pod is eaten, raw or lightly cooked, and is a staple of stir-fry cooking. Snow peas are harvested earlier than the other two types, while the pod is still flat and before the peas inside have swollen noticeably.
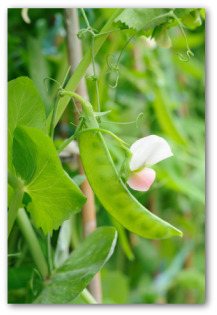
Snap peas (sometimes called sugar snap peas) combine the best of both other types - the entire pod is edible like a snow pea, but the peas inside are allowed to fill out and plump up like a shelling pea, giving a thick, crisp, very sweet pod that many gardeners consider the single most rewarding type to grow fresh. For gardeners deciding how to grow peas for the first time with maximum payoff for minimum kitchen prep, snap peas are very often the recommended starting point.
The three types of peas compared
| Type | Pod | Harvest Stage | Popular Varieties |
|---|---|---|---|
| Shelling (garden) peas | Tough, inedible; discarded | Pod plump and rounded, before waxy | Green Arrow, Lincoln, Wando |
| Snow peas | Flat, thin, fully edible | Flat, before peas swell noticeably | Oregon Sugar Pod, Mammoth Melting Sugar |
| Snap peas | Thick, crisp, fully edible | Plump but still glossy, not dull | Sugar Ann, Sugar Snap, Cascadia |
Bush or Vining? Choosing Your Pea Variety

Alongside choosing a pea type, deciding between bush and vining growth habits is the other key variety decision in how to grow peas successfully, since it directly determines how much support you will need to provide.
Bush (dwarf) pea varieties grow to roughly eighteen to thirty inches tall and are largely self-supporting, needing little or no trellis - just a few twiggy sticks pushed in among the plants are often enough to keep them from flopping over. They are the simplest choice for compact spaces, containers, and gardeners who want to skip building a trellis entirely.
Vining (tall) pea varieties climb four to six feet or more and produce significantly more over their season, but they need a sturdy trellis, netting, or fence to climb.
Many experienced gardeners consider the extra effort of trellising tall varieties well worth it, since vertical growing also improves air circulation around the plants and makes harvesting far easier than hunting through low, sprawling bush foliage.
This single decision shapes most of the remaining steps in how to grow peas successfully, so it is worth making deliberately rather than as an afterthought. See our complete vertical vegetable garden guide for trellis ideas that work particularly well for peas.
When to Plant Peas

Timing is one of the most important things to get right in how to grow peas, because peas are a true cool-season crop that performs best in the moderate temperatures of early spring and declines quickly once summer heat arrives. Quality and yield drop sharply once temperatures climb above 80 degrees Fahrenheit, so the goal is to get peas planted early enough that they mature and finish their harvest before the hottest part of summer sets in.
For a spring crop, sow pea seeds directly outdoors four to six weeks before your last frost date, as soon as the soil can be worked and is no longer frozen or waterlogged. Peas germinate even in fairly cool soil, though germination speeds up considerably once soil reaches around 60 degrees Fahrenheit. Light frost does not harm established pea seedlings, which is part of why they can go in the ground so much earlier than warm-season crops.
For a fall crop, sow seeds again about eight to ten weeks before your first fall frost date, timed so the plants mature in the cooling temperatures of autumn rather than struggling through late summer heat. In warmer climates (roughly Zones 8 through 10), many gardeners get their best results from growing peas through autumn and winter instead of spring, planting as early as October for a long, mild-season harvest. Use our free interactive zone finder to confirm your frost dates before planning your how to grow peas schedule for either season.
For a continuous harvest through the height of the season, sow a new short row every ten to fourteen days through the spring planting window, a classic succession planting approach that keeps fresh peas coming for weeks rather than all arriving in one short burst. See our complete succession planting vegetables guide for more on this technique.
Pea planting calendar by region
| Region | Spring Sowing | Fall Sowing | Notes |
|---|---|---|---|
| Northern US (Zones 3-5) | Late March to April | Early August (if season allows) | Spring is the primary and most reliable season |
| Mid-Atlantic / Midwest (Zones 5-6) | March | Mid to late August | Both spring and fall crops work well |
| Pacific Northwest (Zones 7-8) | February to March | August to September | Long, mild season suits two full crops |
| Southern US (Zones 8-10) | January to February | October (best season in many areas) | Fall/winter growing often outperforms spring |
Soil Preparation and Site Selection

Good soil preparation makes a real difference in how to grow peas with vigorous plants and a generous harvest, even though peas are far less demanding than heavy feeders like tomatoes or squash. Getting this one step right early on pays off for the rest of the season.
Peas prefer a well-drained garden loam with a pH between 6.0 and 7.5, and they dislike heavy, waterlogged soil more than almost any other common vegetable - soggy conditions quickly lead to root rot in young plants.
soi, but avoid the temptation to add a high-nitrogen fertilizer at this stage. Peas are legumes that fix their own nitrogen from the air through bacteria in their root nodules, so excess nitrogen in the soil actually discourages this natural process and pushes the plant toward leafy growth at the expense of pods.
Many experienced growers inoculate pea seeds with a rhizobium inoculant - a powder containing the specific bacteria that peas need to fix nitrogen - especially in beds where peas or beans have not been grown recently. This simple, inexpensive step can significantly boost yields in soil that lacks an established population of the right bacteria.
Choose a site in full sun, ideally six to eight hours of direct light daily, though peas tolerate a bit more shade than most fruiting vegetables. Crop rotation matters for peas just as it does for other legumes - avoid planting peas in the same bed where peas or beans grew the previous year, to reduce the buildup of soil-borne diseases that affect this plant family.
How to Plant Pea Seeds

The practical mechanics of how to plant peas are simple and entirely based on direct sowing - peas dislike root disturbance and are essentially never started indoors and transplanted the way tomatoes or peppers are.
Sow pea seeds one to two inches deep directly in prepared garden soil.
For vining varieties grown along a trellis, space seeds about two inches apart in a double row six to eight inches apart, which makes the most efficient use of a single length of support.
For bush varieties grown without a trellis, space seeds three to four inches apart in single rows eighteen to twenty-four inches apart, leaving room to walk between rows for harvesting.
Soaking pea seeds in water for eight to twelve hours before planting can speed up germination slightly, which is particularly useful with older seed or in cooler-than-ideal soil.
Water the bed well immediately after sowing, and keep the soil consistently moist - not waterlogged - until seedlings emerge, which typically takes five to ten days in reasonably warm soil.
If a trellis or netting will be used, it is far easier to install it before or immediately after sowing rather than later, once seedlings are up and their shallow roots are more easily disturbed.
Trellising and Supporting Pea Plants

Providing the right support is one of the most practical parts of how to grow peas for vining varieties, since unsupported vines flop over, tangle together, and produce pods that are difficult to find and harvest cleanly. This is one part of how to grow peas that beginners sometimes underestimate until mid-season, when a tangle of unsupported vines makes harvesting genuinely frustrating.
Peas climb using small curling tendrils that reach out and grip onto anything nearby - they do most of the climbing work themselves once given something to grab onto.
A simple length of garden netting or chicken wire stretched between two sturdy stakes works perfectly for most vining pea varieties.
Twiggy branches or pea sticks pushed into the ground among young plants are a traditional, low-cost option that peas climb naturally.
For taller varieties reaching five to six feet, a more substantial trellis or fence section provides the stability needed to support a heavy, mature crop in wind.
Install support at planting time or very shortly after seedlings emerge, while their root systems are still small and unlikely to be disturbed by the activity. Gently lean young seedlings toward the support if they have not yet found it on their own - once a tendril makes contact, the plant takes care of the rest.
Consistent moisture is one of the more important ongoing tasks in how to grow peas well, since peas have relatively shallow, fragile roots that do not tolerate drought stress gracefully, particularly once flowering and pod formation begin.
Keep soil uniformly moist but never waterlogged throughout the growing season. About one inch of water per week is generally sufficient in cool spring conditions, increasing somewhat if a warm spell arrives.
The most critical period for consistent watering is from flowering through pod fill - moisture stress at this stage directly reduces both the number and the quality of pods that develop.
A light mulch of grass clippings, shredded leaves, or straw around established plants helps maintain this even moisture while also keeping the shallow root zone cool as temperatures rise later in the season.
Fertilizing is rarely necessary in how to grow peas, precisely because of their nitrogen-fixing ability. If plants are mulched well at planting time with a biodegradable material like grass clippings or shredded leaves, additional feeding usually is not required at all. The one situation where a light nitrogen side-dressing can help is if plants appear yellowish or pale specifically after pods have already begun to set, which can indicate the nitrogen-fixing process is not fully keeping pace with the plant's needs at that demanding stage.
How to Harvest Peas

Harvesting at exactly the right moment is the single most important skill in how to grow peas for the best possible flavor, since peas move from perfect to overmature surprisingly quickly once they begin producing in earnest. Mastering this timing is, for many gardeners, the most satisfying part of learning how to grow peas well.
Most pea varieties are ready to harvest 55 to 70 days after planting, and once flowering begins, pods develop fast enough that checking plants daily is genuinely worthwhile during peak season. Each pea type has a slightly different sign of peak readiness.
Snow peas should be picked while the pod is still flat and the peas inside are barely visible as small immature bumps - waiting any longer makes the pod tougher and less tender.
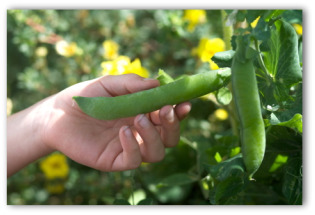
Snap peas are at their best when the pod has filled out and become plump, but is still glossy and bright rather than dull or starting to fade - a dull, faded pod has usually gone past its peak sweetness.
Shelling peas should be picked once the pod feels well-filled and rounded but before it becomes hard, dry, or waxy in texture.
Harvest in the morning after any dew has dried, since peas picked at this time are at their crispest.
Pick every two to three days during peak production, since the sugars in mature peas convert quickly to starch the longer they sit on the vine, and regular picking also encourages the plant to keep setting new flowers and pods rather than slowing down.
Use two hands when picking - one to hold the vine steady and the other to pull the pod free - since pea vines are fragile and easily damaged if pods are yanked off with one hand alone.
Harvest signs by pea type
| Pea Type | Sign of Peak Readiness | Signs of Overmaturity |
|---|---|---|
| Snow peas | Pod flat; peas barely visible inside | Pod thickening; peas clearly bulging |
| Snap peas | Pod plump and glossy, still bright | Pod dull or fading; starting to toughen |
| Shelling peas | Pod well-filled and rounded | Pod hard, dry, or waxy in texture |
Common Problems When Growing Peas
A handful of recurring issues account for most of the trouble gardeners run into while learning how to grow peas, and most have simple, well-understood causes and fixes.
Yellowing leaves on otherwise healthy-looking pea plants are very often simply a response to heat stress rather than a disease or deficiency, particularly as spring transitions toward summer. Providing some afternoon shade - even a simple row cover propped to filter direct sun - and watering thoroughly during the hottest part of the day helps reduce this stress considerably. If yellowing appears specifically after pods have set and is not heat-related, it may indicate the plant's nitrogen-fixing process needs support from a light side-dressing.
Powdery mildew, a white powdery coating on leaves and pods, is a common late-season problem as warm, dry weather sets in toward the end of the pea-growing window. Planting early enough that the bulk of the harvest finishes before mildew season peaks is the most effective prevention, along with choosing varieties specifically bred for mildew resistance.
Pea aphids form pale green colonies on growing tips and can weaken plants while spreading viral diseases between them. A strong jet of water dislodges light infestations, and insecticidal soap controls more established colonies. Pea moth is a more localized problem in some regions, where the larvae tunnel into developing pods and feed on the peas inside; fine insect mesh placed over plants during flowering, when the moth lays its eggs, is the most reliable organic prevention.
Slugs and snails are a serious threat to young pea seedlings, particularly in damp spring conditions, often stripping seedlings down to nothing within days of emergence. Hand picking at night, iron phosphate bait, and copper barriers around the bed all help protect vulnerable young plants until they are established enough to tolerate some nibbling.
Common pea problems and solutions
| Problem | Most Likely Cause | Solution |
|---|---|---|
| Yellowing leaves | Heat stress; occasionally nitrogen lag after pod set | Afternoon shade; water during hot periods; light nitrogen side-dress if needed |
| White powdery coating | Powdery mildew, common late season | Plant early to finish before mildew season; choose resistant varieties |
| Pale green colonies on growing tips | Pea aphids | Jet of water; insecticidal soap for established colonies |
| Tunneled, damaged pods | Pea moth larvae | Fine insect mesh during flowering period |
| Seedlings stripped or disappearing | Slugs and snails | Hand pick at night; iron phosphate bait; copper barriers |
Companion Planting for Peas

Companion planting offers genuine, practical benefits in how to grow peas, both through pest deterrence and the soil-improving nitrogen that peas contribute to their neighbors. Thinking about companions is a small extra step worth adding to your how to grow peas planning each season.
Carrots, lettuce, spinach, radishes, and cucumbers are all excellent companions for peas, sharing compatible growing conditions without competing aggressively for resources.
Beans share a similar relay relationship with peas in many gardens - peas finish as the cool season ends, and beans take over the same trellis for the warm season that follows, making efficient use of the same support structure across two crops in a single year.
Keep peas away from onions and garlic, both of which can inhibit pea growth when planted too closely. See our complete companion planting chart for vegetables for the full guide to pairing peas with other crops in your garden.
Growing Peas in Containers

Growing peas in containers works well, particularly for compact bush varieties that need little or no support.
Choose a container at least eight to ten inches deep with good drainage, fill with a quality potting mix blended with compost, and sow seeds at the same spacing recommended for in-ground bush plantings.
Container-grown peas need slightly more frequent watering than in-ground plantings, since pots dry out faster, but otherwise respond to the same care described throughout this guide.
A simple obelisk or small trellis tucked into a large container also allows vining varieties to be grown successfully in a relatively small footprint, making peas a practical choice even for a patio or balcony garden.
See our complete container vegetable gardening guide for further advice on container growing.
Frequently Asked Questions About How to Grow Peas

1. How long does it take to grow peas from seed to harvest?
Most pea varieties take 55 to 70 days from sowing to first harvest, depending on the specific variety and growing conditions. Once flowering begins, the harvest period itself typically lasts only about two to three weeks before the heat of early summer brings the crop to its natural end in most climates.
2. Do peas need a trellis?
Vining varieties, which can reach four to six feet tall, genuinely need a trellis, netting, or other support to grow well and to keep pods accessible for harvesting. Bush (dwarf) varieties, by contrast, stay short enough that they are largely self-supporting and need little more than a few twiggy sticks for light stabilization, if anything at all.
3. Why didn't my peas come up after planting?
The most common causes of poor pea germination are soil that was too cold or too wet at sowing time, seeds planted too deep, or old seed with reduced viability. Wait until soil can be worked and is no longer waterlogged, plant at the recommended one to two inch depth, and use fresh seed from a reliable supplier for the most consistent results.
4. Can I grow peas in the same spot every year?
It is best to avoid this. Like other legumes, peas are susceptible to a buildup of soil-borne diseases when grown repeatedly in the same location. Rotating peas to a different bed each year, and avoiding any bed where peas or beans grew the previous season, significantly reduces this risk.
5. Why are my pea pods small or not filling out?
Pods that stay small or never fill out properly are most often the result of heat stress as temperatures climb, inconsistent watering during flowering and pod fill, or poor pollination in some varieties. Planting early enough to finish the bulk of the harvest before sustained heat arrives, and keeping soil consistently moist through flowering, addresses the great majority of cases.
More Vegetable Growing Guides

- Growing Vegetables — complete hub for growing all vegetables at home
Recent Articles


-
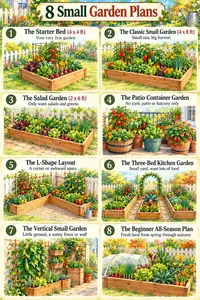
Small Vegetable Garden Plans: 8 Layouts That Maximise Space
Oct 08, 26 10:41 AM
 Small vegetable garden plans are some of the most searched and most valuable resources in home food growing.
 -
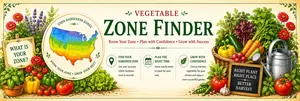
USDA Zone Finder - Find Your Vegetable Planting Dates | Vegetable-Gardening-Online.com
Oct 07, 26 03:53 PM
 Find your USDA hardiness zone, last spring frost date, and first fall frost date by state and region. Free interactive zone finder from Vegetable-Gardening-Online.com.
 -
Interactive Vegetable Garden Planner | Vegetable Gardening Online
Oct 07, 26 02:29 PM
Design a vegetable garden with correctly scaled plant spacing, companion flowers, drag-and-drop placement, and a printable plan. -
Free Printable Garden Stationery: Gardening Letter Paper & Note Cards
Oct 07, 26 12:48 PM
Free printable garden stationery: watercolor letter paper, lined and unlined, plus folded note cards with garden, fall, and Christmas scenes. Print at home. -
Free Preschool Vegetable Garden Cut and Paste Activities
Oct 07, 26 12:43 PM
 Free preschool vegetable garden cut and paste activities for ages 3-4. Build your own backyard, container, or seed packet garden scene, and sticker sheets.
 -
Planning a Vegetable Garden: Layouts, Raised Beds, Containers & More
Oct 06, 26 07:44 PM
 Planning a vegetable garden? Start here: layouts, raised beds, containers, square foot gardening, free planning tools, and tips to avoid beginner mistakes.
 -
How to Start a Vegetable Garden: 10 Easy Steps for Beginners
Oct 06, 26 04:38 PM
 How to start a vegetable garden in 10 easy steps: pick a sunny spot, choose raised beds or containers, prepare the soil, and grow easy vegetables.