How to Grow Peppers in Your Vegetable Garden

Wondering how to grow peppers in your vegetable garden?
Here are some quick and easy tips for planting, growing, fertilizing and harvesting peppers in your backyard gardens!
Design Your Own Vegetable Garden Layout Using our Free "Vegetable Garden Planner" Software!

Best Tips for Growing Peppers
1. Choose pepper varieties suited to your climate zone!
2. Do not plant too early for your climate; peppers are very sensitive to frost!
3. Plant peppers in location with full sun, and good drainage.
4. Add a layer of mulch to keep soil from cracking and drying around pepper plants.
5. Provide adequate water especially when plants are blooming, but don't over-water. Water deeply to encourage root growth.
Best Advise on How to Grow Peppers
The advice we offer on how to plant peppers is meant to give you the greatest opportunity for successful vegetable gardening.
We want your very first attempts at growing bell peppers, sweet peppers, hot peppers, or any other variety of peppers in your vegetable garden to be a rousing success!
Many times, beginning gardeners (as well as seasoned growers) are met with frustration and disappointment at their efforts.
Often the reason for a lackluster harvest can be chalked up to a gardener attempting to grow plants that are not suitable for their particular region.
There really isn't much you can do about the weather in your area.
Although, you can start out a step ahead by choosing seeds and plants well-suited to your climate!
For instance, if you live in Kentucky, as inviting as the name sounds, planting the bell pepper variety California Wonders may have little chance of performing well in your garden.

How to Grow Peppers
Gardeners all over the US can choose from dozens of pepper varieties suited to different vegetable gardening zones.
While peppers are native to the tropics, successful cultivation is possible in northern climates including Canada.
Some of the more common pepper varieties include sweet or bell peppers; hot peppers such as chili, cayenne, jabenero and jalapeno peppers.
Pepper plants can be grown in container gardens, raised bed gardens, or can be planted in the ground in a traditional backyard row garden.
When to Plant Peppers
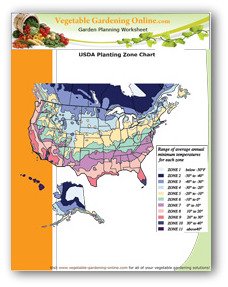
Download zone chart here!
Pepper plants are not frost hardy, and should only be planted outdoors after the danger of frost has passed.
Use the zone chart to help decide when it is a good time to plant peppers outdoors in your climate zone.
If you find out that it is going to frost after your peppers are planted in the ground, cover the plants with a plastic milk container, bucket, fabric, or a hat made of newspapers.
If you are growing peppers in a container garden, move the container indoors or to a sheltered area to avoid frost bite.

Download Free Garden Planning Worksheets, Garden Diary, Zone Chart, Or Planting Guide
Planting Pepper Seeds Indoors
Here are some tips for how to grow peppers in cooler climate zones:
Start your plants indoors 10-12 weeks before the last expected frost.
Cover seeds lightly in the seed containers.
Germination takes place in around 10 days when soil temperature is kept at 70-80 degrees F.
Transplant after seedlings develop their first set of true leaves.
Buy Pepper Plants Ready to Transplant

How to grow peppers the easy way:
Pepper plants can also be purchased at a garden store for transplant into your vegetable garden.
This eliminates the chore of starting seeds indoors and tending the seedling pepper plants.
Where to Grow Pepper Plants

Grow peppers in a sunny location where temperatures remain above 60 degrees F.
The plants like a moderately fertile soil, good drainage, and a pH of 6 and above.
Avoid applying fresh manures as well as too much nitrogen.
Pepper production is helped immensely by the use of black mulches and cover protection early in the season.
Tips for How to Grow Peppers

By planting your pepper plants rather close on a wide row, you can increase the harvest yield.
Set smaller plants two abreast and stagger larger plants.
- While the plants are very tender in the spring, the vegetables are quite hardy at the end of the season.
- Gardeners with limited space can grow a wide variety of peppers as container plants.
- Small hot peppers are excellent for eating and ornamental use.
- There is less stress to the plants if harvesting is done by cutting with garden shears.
- Be careful when handling hot peppers, which contain high concentrations of a skin and eye irritant.
Harvesting Peppers

Selecting a variety of sweet and hot peppers gives you a harvest of fruits over a very long growing season. (50-75 days after setting out.)
Peppers will continue to set flowers and fruits until a hard frost.
When growing sweet or bell peppers, they may be harvested as soon as they have any size to them.
Colored varieties, such as red and chocolate, will start off green and then mature into their namesake colors, if left growing on the plant.
Peppers hold up well on the plants in the garden, so pick fruits as you need them.
It may take a season or two to find the right variety of peppers for growing in your garden.
However, by selecting local plants or seeds recommended from local growers, you may experience a bumper crop consistently from your initial planting!
One of the easiest vegetables to grow is bell peppers.
By following our guide on how to grow peppers, you will soon be on your way to vegetable gardening greatness!
Recent Articles
-
Growing Dill In a Backyard Vegetable Garden
Nov 20, 18 11:40 PM
 Easy tips for growing dill in a home vegetable, kitchen, or herb garden. Learn how to plant, grow, care for, and harvest dill plants when backyard vegetable gardening.
 -
Vegetable Garden Pictures to Help Plan Your Garden
Nov 20, 18 09:53 AM
 Vegetable garden pictures and videos to help you get started planting a garden. Gardening pictures can help you plan your garden whether a raised bed, container, or traditional backyard home garden.
 -
Vegetable Gardening Planting Times, Zone Chart, and Guide for When to Plant
Nov 20, 18 09:51 AM
Use our free zone chart and guide for vegetable gardening planting times, to plan your next garden. Whether planting seeds or transplants, learn when to start.