Freezing Corn from Your Garden:
Whole Kernel, Cream Style, and On the Cob
Freezing corn is the best way to keep that sweet, fresh-picked flavor all winter. This page shows you how to prepare, blanch, and pack sweet corn three ways: whole kernel, cream style, and corn on the cob.
 ★ Save
Speed matters. Sweet corn starts turning its sugar into starch the moment it is picked. Pick it, husk it, and get it into the freezer the same day, ideally within a few hours. Freezing keeps more of corn's fresh flavor and color than canning does.
Our Family Favorite
Cream-style corn was always our family favorite, served with Thanksgiving and Christmas dinners!
Charlotte
On This Page
Picking Corn for Freezing
 ★ Save
- Pick at the milk stage: the kernels should be plump and full, and a thin, milky juice should spurt out when you press one with your fingernail. If the juice is clear, the corn isn't ready; if it is thick and doughy, it is past its best for whole kernel (but still fine for cream style).
- Variety: all yellow and white sweet corn varieties freeze well, and Golden Cross Bantam is an old favorite. Small, early varieties are especially nice for freezing on the cob.
- Clean it well: husk the ears, remove all the silk, and trim away any spots damaged by corn earworms or borers.
See growing corn for how to tell when your corn is ripe in the garden.
Freezer Containers and Bags
Use airtight, moisture-proof packaging. Air and moisture loss cause freezer burn: dry, tough, off-flavored spots. Freezer burn isn't harmful, but it ruins the texture and taste.
- Rigid freezer containers: leave 1/2 inch of headspace for whole kernel and cream-style corn, since the corn expands as it freezes.
- Freezer bags: press out as much air as you can before sealing. A flat bag freezes faster and stacks neatly.
- No liquid needed: corn is packed on its own, with no water or syrup.
Label every package with the contents and the date.
Blanching Times for Freezing Corn
All corn must be blanched (briefly boiled) before freezing. Blanching stops the natural enzymes that would otherwise make frozen corn tough and tasteless. Use a big pot of rapidly boiling water, and start timing as soon as the water returns to a boil.
 ★ Save
| How you're freezing it | Blanch the whole ears for |
|---|---|
| Whole kernel corn | 4 minutes |
| Cream-style corn | 4 minutes |
| Corn on the cob, small ears | 7 minutes (1 1/4 inches across or less) |
| Corn on the cob, medium ears | 9 minutes (1 1/4 to 1 1/2 inches across) |
| Corn on the cob, large ears | 11 minutes (over 1 1/2 inches across) |
These are the tested times from the National Center for Home Food Preservation. After blanching, cool the ears quickly in ice water for about the same length of time, then drain.
Freezing Whole Kernel Corn
- Prepare the ears. Husk, remove the silk, trim, and wash the corn.
- Blanch 4 minutes, then cool in ice water and drain.
- Cut the kernels from the cob at about two-thirds of their depth.
- Pack into freezer bags or containers, leaving 1/2 inch of headspace in containers. Seal, label, and freeze.
To serve: cook frozen kernels in a little boiling water for 3 to 5 minutes.
Freezing Cream-Style Corn
Cream style is a good way to use corn that is a little past the milk stage.
 ★ Save
- Prepare the ears. Husk, remove the silk, trim, and wash the corn.
- Blanch 4 minutes, then cool in ice water and drain.
- Cut the kernels from the cob at about half their depth.
- Scrape the cob with the back of a knife to get out the milk and the hearts of the kernels, and stir them in with the cut kernels.
- Pack into containers, leaving 1/2 inch of headspace. Seal, label, and freeze.
Freezing Corn on the Cob
 ★ Save
- Choose young ears in the early milk stage. Husk, remove the silk, trim the ends, and wash.
- Blanch by size: 7 minutes for small ears, 9 minutes for medium, and 11 minutes for large (see the table above).
- Cool in ice water until the cob is cold all the way through, then drain.
- Wrap each ear (or two) tightly in plastic wrap, then in foil or a freezer bag, or pack small ears in containers.
- Freeze at 0°F or colder.
To serve: cook frozen corn on the cob in boiling water for about 4 to 6 minutes, or thaw it partly first so the cob heats through.
Time-Saving Tips
 ★ Save
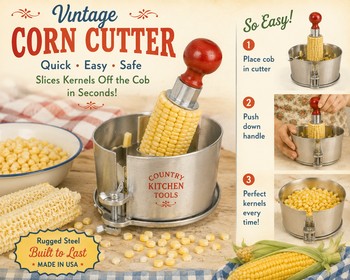
- Cutting tools: you can cut corn from the cob with a sharp knife, but a corn cutter tool is a big help if you are doing dozens of ears. Keep the blade sharp.
- Stand the cob in a bowl: set the narrow end of the cob in the center hole of a tube or Bundt pan, and the kernels fall neatly into the pan as you cut.
- Work in batches: blanch only as much as you can cool, cut, and pack in a short time.
- Freeze fast: spread the new packages out in the freezer, not stacked, until they freeze solid.
 ★ Save
How Long Frozen Corn Keeps
Properly packed frozen corn keeps its best quality for about 8 to 12 months at 0°F or colder. It stays safe longer, but the flavor and texture slowly fade, so plan to use it before next summer's harvest.
For more details, see the National Center for Home Food Preservation's freezing corn guide.
More Ways to Preserve Your Harvest
This page is part of our Preserving Garden Vegetables hub, with complete guides to canning, freezing, fermenting, drying, and freeze drying vegetables from your home garden.
My short garden email, Get the Dirt, comes Saturday mornings.
Sign Up for My Free Newsletter