- Home
- How to Grow Vegetables
- Carrots
- How to Grow Carrots
How to Grow Carrots

Learning how to grow carrots is one of the most rewarding steps in vegetable gardening.
The flavor of a homegrown carrot pulled fresh from the soil - sweet, crisp, and earthy in a way that supermarket carrots never achieve - is reason enough to grow them.
Carrots are also available in a remarkable range of colors, sizes, and flavors when you grow your own: deep purple, golden yellow, crimson red, and classic orange, in varieties you will never find in a grocery store.
Carrots do have one significant reputation as a difficult crop - and it is partially deserved.
They are more particular about soil conditions than most vegetables, and inconsistent moisture or poor soil preparation leads to forked, stunted, or woody roots.
But once you understand what they need, learning how to grow carrots is genuinely straightforward.
The key is soil preparation.
Get that right and almost everything else about how to grow carrots falls into place.
- Choosing Carrot Varieties
- Soil Preparation
- Growing Carrots in Raised Beds
- When to Plant Carrots
- How to Plant Carrot Seeds
- Thinning Carrots
- Watering and Mulching
- Feeding Carrots
- Common Problems and Solutions
- How to Harvest Carrots
- Storing Carrots After Harvest
- Growing Carrots in Containers
- Companion Planting for Carrots
- Frequently Asked Questions
Choosing Carrot Varieties
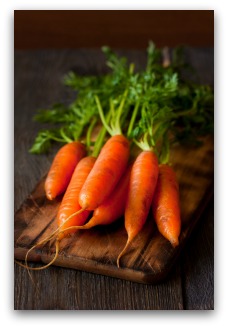
One of the greatest joys of learning how to grow carrots is discovering how many varieties exist beyond the single orange type sold in supermarkets.
Carrots come in five main types, each suited to different soil conditions, uses, and tastes.
Choosing the right type for your soil is the most important variety decision you will make.
Nantes carrots are the best choice for most home gardeners growing carrots for the first time. They are medium length (five to seven inches), blunt-tipped, very sweet, and adaptable to a wide range of soil conditions.
Their cylindrical shape means they are more forgiving of slightly heavier or rockier soil than longer varieties, and their flavor is considered by many experienced growers to be the best of all carrot types for fresh eating.
Chantenay carrots are shorter and broader-shouldered (three to five inches), making them the best choice for growing carrots in heavier clay soils where longer varieties would fork and deform.
They have good storage qualities and excellent flavor.
If your soil is not perfectly loose and sandy, Chantenay is your most reliable option for growing carrots successfully.
Danvers carrots are the classic American home garden carrot - seven inches, tapered, and reliable in a range of soil types.
They have strong flavor and are excellent for both fresh eating and storage. Imperator types are the long, thin, pointed carrots familiar from supermarkets - excellent for juicing but require very deeply worked, stone-free soil to grow straight.
For something more adventurous, colored carrot varieties are among the most fun and rewarding crops in any vegetable garden.
Purple Dragon, Cosmic Purple, Solar Yellow, Atomic Red, and Lunar White all offer dramatically different appearances and subtly different flavors from standard orange carrots.
Most are available from good seed suppliers as open-pollinated varieties that can be saved from year to year.
Carrot variety guide for home gardeners
| Type | Length | Best Soil | Days to Harvest | Best For |
|---|---|---|---|---|
| Nantes | 5-7 inches; cylindrical | Most soils; very adaptable | 65-75 days | Fresh eating; beginners; best flavor |
| Chantenay | 3-5 inches; broad-shouldered | Heavy or clay soils | 65-75 days | Clay soils; storage; reliable in difficult conditions |
| Danvers | 6-8 inches; tapered | Average to good soils | 70-80 days | All-purpose; fresh eating and storage |
| Imperator | 8-10 inches; slender | Deep, loose, stone-free only | 70-80 days | Juicing; show carrots; requires perfect soil |
| Amsterdam | 3-4 inches; slender | Most soils; excellent in containers | 58-65 days | Containers; early harvests; baby carrots |
| Colored varieties | Varies by variety | As per type above | 65-80 days | Novelty; salads; flavor variation; seed saving |
Soil Preparation:
The Most Important Step When Growing Carrots
Soil preparation is the single most critical step in how to grow carrots successfully - more important than variety selection, timing, or any other factor.
Carrots are root vegetables that grow entirely underground. The soil they grow in directly determines the shape, size, and quality of the root.
Stony, compacted, or poorly worked soil produces forked, stubby, or deformed carrots. Deeply prepared, loose, stone-free soil produces long, straight, beautiful roots.
The ideal soil for growing carrots is loose, deeply worked, and free of stones, large clods, and compaction down to at least 10 to 12 inches for standard varieties (deeper for Imperator types).
Sandy loam is naturally ideal.
Heavy clay soil must be significantly amended before it will produce good carrots - work in generous amounts of coarse sand and compost to improve drainage and loosen texture.
Never add fresh manure when growing carrots - it causes roots to fork in multiple directions as they grow around the nitrogen concentrations.
Avoid working green manure into a carrot bed as well. Like fresh manure, undecomposed green manure disrupts the fine, even soil texture carrots need and can cause the same forking and branching problems.
How to Grow Carrots in Raised Bed Gardens
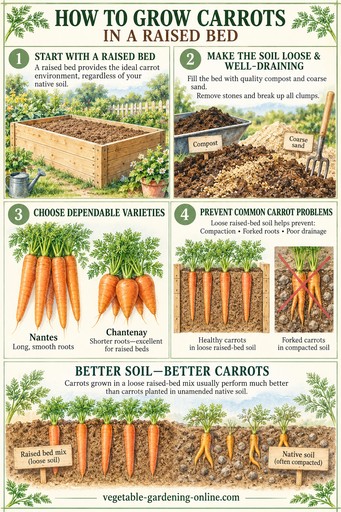 Step by step chart of how to grow carrots in a raised bed garden.
Raised beds are the best solution for how to grow carrots in most home gardens.
A raised bed filled with a loose, well-draining growing mix provides the ideal carrot environment regardless of what your native soil is like, and eliminates the most common causes of carrot failure - compaction, stones, and poor drainage.
If you are growing carrots in a raised bed for the first time and want near-perfect results, choose Nantes or Chantenay varieties.
Fill the bed with a mix of quality compost and coarse sand.
The results will be significantly better than attempting to grow carrots in un-amended native soil.
A soil pH of 6.0 to 6.8 suits carrots well. Test your soil before planting if you have not done so recently - a basic home test kit costs ten to fifteen dollars and removes the guesswork about pH and basic nutrient levels.
When to Plant Carrots
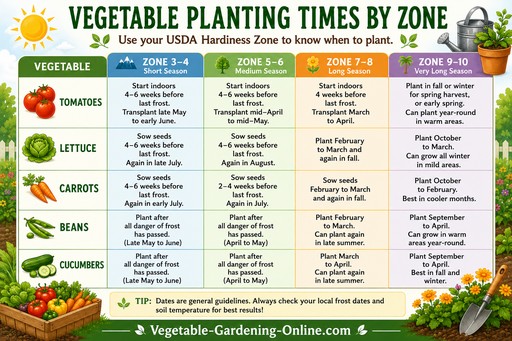 Chart of common garden vegetables planting times by zone.
Timing is important when growing carrots because they are cool-season vegetables that grow best in cool soil and cool air temperatures.
The ideal soil temperature for carrot seed germination is 55 to 75 degrees Fahrenheit.
Carrot seeds germinate very slowly in cold soil and struggle in hot soil - the sweet spot for growing carrots is the cool temperatures of spring and early fall.
For a spring crop, sow carrot seeds directly outdoors two to four weeks before your last frost date.
Carrot seeds tolerate light frost and the cool spring soil is ideal for germination and early root development.
Sowing too early into frozen or near-frozen soil delays germination significantly and risks seed rot.
Use our free interactive zone finder at the link below to confirm your last frost date before planning your carrot planting dates.

For a fall crop, sow carrot seeds ten to twelve weeks before your first fall frost date.
Fall-grown carrots are considered by many experienced gardeners to be superior in flavor to spring carrots - the cooling temperatures of autumn trigger the conversion of starches to sugars that makes carrots noticeably sweeter.
Leaving fall carrots in the ground after frost, protected by a thick mulch layer, extends the harvest window through much of winter in most climates.
This "in-ground storage" approach is one of the most practical and rewarding aspects of how to grow carrots for autumn and winter use.See our fall vegetable gardening guide for more information.
For a continuous harvest through the growing season, sow a new row of carrots every three to four weeks from late spring through midsummer, stopping in time for your last sowing to mature before the heat sets in.
Five to ten feet of row at each sowing is usually enough to keep a home kitchen supplied without an overwhelming glut at once.
Avoid sowing carrot seeds during the heat of midsummer.
Soil temperatures above 80 degrees Fahrenheit inhibit germination, and carrots that germinate in hot conditions often develop pale, tough, bitter roots.
In most of the US, this means avoiding carrot sowings in June, July, and August - though in cooler northern climates midsummer sowing may be possible if soil temperatures stay moderate.
Carrot planting calendar
| Region | Spring Planting | Fall Planting | Harvest Window |
|---|---|---|---|
| Northern US (Zones 3-5) | Late April to mid May | Late June to mid July | Summer; fall through early winter under mulch |
| Mid-Atlantic / Midwest (Zones 5-6) | Late March to mid April | July to early August | Late spring to summer; fall through winter under mulch |
| Pacific Northwest / Mountain (Zones 6-7) | March to April | July to August | Summer; fall and winter with mulch protection |
| Southern US (Zones 7-9) | February to March | August to October | Spring; fall and winter (best season in warm climates) |
How to Plant Carrot Seeds
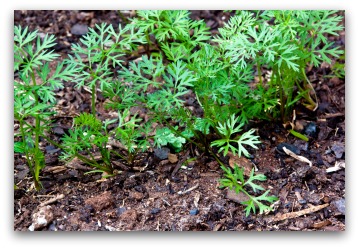
Planting carrot seeds correctly is one of the trickier aspects of how to grow carrots, because carrot seeds are very small, slow to germinate, and require consistent moisture at the soil surface throughout the germination period.
These requirements are easy to meet once you know what they are.
Because carrot seeds are slow to germinate, many gardeners sow a few radish seeds in the same row.
Radishes sprout quickly and mark the row clearly while the carrots are still germinating underground, and they are harvested out of the way within a few weeks — right around the time the carrots need the space.
Never transplant carrots. Unlike most vegetables that can be started indoors and transplanted outside, carrots must be direct sown in their final growing position.
Carrots are tap-rooted vegetables and any disturbance to the taproot during transplanting causes forking and deformity.
Always sow carrot seeds directly in the prepared outdoor bed where they will grow to maturity.
Sow carrot seeds at a depth of one quarter to one half inch. Carrot seeds are tiny - mixing them with sand, dry coffee grounds, or fine vermiculite before sowing helps distribute them more evenly and prevents clumping.
Sow more thickly than the final spacing - approximately one seed every half inch to one inch - and thin to final spacing after germination.
Thinning is essential and is one of the most commonly skipped steps in growing carrots.
Crowded carrots produce small, misshapen roots that push each other out of shape.
Thin to one carrot every two to three inches when seedlings are about two inches tall.
Keeping the soil surface consistently moist from sowing until germination is the most critical management task in how to grow carrot seeds.
Carrot germination takes seven to twenty-one days depending on soil temperature, and the seeds must not dry out during this period.
A dry period that kills germinating seedlings before they emerge is the most common cause of carrot germination failure.
Water gently with a fine spray or mist every one to two days and do not allow the surface to crust or dry out completely.
Laying a board, a piece of burlap, or a sheet of shade cloth over the bed retains moisture and moderates temperature during germination, removing it as soon as the first seedlings appear.
Thinning Carrots: The Step Most Gardeners Skip
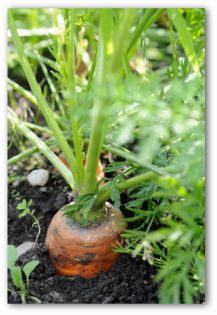
Space carrot rows 16 to 24 inches apart.
This gives you enough room to weed and thin comfortably without disturbing neighboring rows, and allows carrot foliage to fill in without excessive crowding between rows.
Thinning is the most commonly neglected step in how to grow carrots, and skipping it is the most common reason for small, crowded, misshapen roots.
It feels counterintuitive to remove healthy young plants, but crowded carrots cannot develop properly - the developing roots compete for space in the soil and push each other sideways, producing the twisted, forked, and stunted carrots that frustrate so many home gardeners.
Thin carrot seedlings to two to three inches apart when they are two inches tall. Use scissors to snip thinned seedlings at soil level rather than pulling them - pulling out a seedling disturbs the roots of its neighbors and can set back the remaining plants.
The thinned seedlings are edible - they taste like mild baby greens and are a delicious bonus harvest!
A second thinning to three to four inches apart when seedlings are four to five inches tall further improves root development for longer varieties.
This may feel like removing a lot of plants, but the carrots that remain will be dramatically larger, straighter, and better flavored than a crowded row would produce.
These thinned carrots can also be eaten; they do not need to go to waste!
Watering Carrots, Mulching Carrots
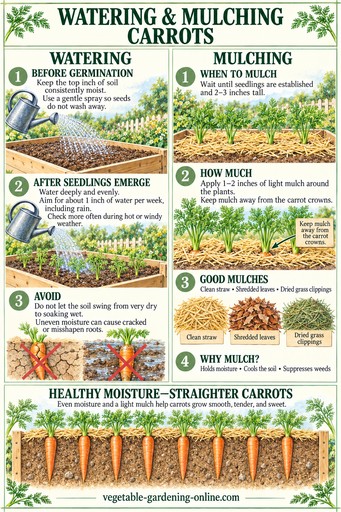 Chart of watering and mulching carrots in the garden.
Consistent watering is essential for how to grow carrots with smooth, evenly shaped roots and good flavor.
Irregular watering - periods of drought followed by heavy watering - causes splitting, cracking, and forking in developing carrot roots. It also produces a woody texture and can cause bitterness.
Water carrot beds to a depth of six to eight inches once or twice per week in dry conditions, providing approximately one inch of water per week.
Deep watering encourages roots to grow downward rather than sideways.
Light, frequent watering keeps roots near the surface and contributes to misshapen growth.
The finger test works well for carrots: push a finger four to five inches into the soil near the plants.
If it is still moist at that depth, watering can wait. If it feels dry, water thoroughly.

Mulching over carrot beds after seedlings are established helps maintain the consistent soil moisture that growing carrots well requires.
A one to two inch layer of straw or shredded leaves between carrot rows reduces evaporation, moderates soil temperature, and reduces the frequency of watering needed.
Keep mulch pulled back slightly from the emerging carrot shoulders to prevent any moisture-related rot issues at the crown.
Feeding Carrots
Carrots are relatively light feeders compared to fruiting vegetables like tomatoes and peppers, and in soil that has been well prepared with compost they typically need little additional feeding through the growing season.
The most important nutritional rule for how to grow carrots is to avoid high-nitrogen fertilizers.
Nitrogen encourages lush leafy growth above ground at the expense of root development below - exactly the opposite of what you want when growing carrots.
A bed that has been heavily fertilized with nitrogen typically produces beautiful leafy carrot tops and disappointing thin, short, woody roots.
If your soil is poor or was not prepared with compost before planting, use a low-nitrogen, high-phosphorus fertilizer appropriate for root crops - look for products with a low first number in the NPK analysis and a higher middle number (phosphorus).
Phosphorus supports strong root development. Apply as a side dressing when plants are four to five inches tall.
For most home gardeners growing carrots in reasonably prepared soil, a generous compost application at planting time is sufficient nutrition for the entire growing season.
Common Carrot Growing Problems and Solutions

Several common problems arise when learning how to grow carrots, and most of them trace back to soil conditions or watering rather than pests or diseases.
Understanding the most likely cause of each problem helps you identify and resolve it quickly.
Forked or deformed carrots are the most common problem when growing carrots.
The cause is almost always soil-related: stones, compaction, large clumps of organic matter, fresh manure, or any underground obstruction that the developing root encounters and grows around.
The solution is thorough soil preparation before planting - remove all stones to a depth of at least ten inches, break up any compaction, work compost in completely rather than leaving large chunks, and never use fresh manure in a carrot bed.
Stunted or short carrots in apparently good soil usually indicate either overcrowding (insufficient thinning), a soil pH that is too low (below 6.0), or waterlogged drainage.
Thin more aggressively, test and adjust pH if needed, and ensure water drains freely through the bed.
Small, pale, tasteless carrots are usually caused by one of three things:
- Growing in the heat of midsummer when soil temperatures are too high for good root development,
- Insufficient watering during root development,
- Overly nitrogen-rich soil that diverts plant energy to foliage.
Address whichever applies to your situation.
Carrot fly is the most significant insect pest when growing carrots in many regions.
The adult fly lays eggs near carrot plants and the larvae tunnel into developing roots, causing significant damage.
The most effective organic control is a fine mesh insect barrier placed over the bed at sowing and kept in place until harvest.
Carrot fly navigate by smell at low height, so a 24-inch-tall barrier of fine mesh or row cover around the bed edge is also very effective.
Companion planting carrots with onions and leeks is a well-documented deterrent - each crop's scent masks the other's from the respective pest flies.
Carrots can occasionally be bothered by caterpillars, leafhoppers, and nematodes as well, though these are far less common than carrot fly and rarely cause serious damage in a well-maintained home garden.
Carrot growing problems and solutions
| Problem | Most Likely Cause | Solution |
|---|---|---|
| Forked or deformed roots | Stones, compaction, fresh manure, clumpy soil | Thorough soil preparation; raised beds; remove all stones; never use fresh manure |
| Short or stunted roots | Overcrowding; low pH; waterlogging | Thin more aggressively; test and adjust pH; improve drainage |
| Pale, tasteless roots | Too much heat; insufficient water; excess nitrogen | Plant in spring or fall; water consistently; avoid high-nitrogen fertilizers |
| Cracked or split roots | Irregular watering; rapid growth after drought | Water consistently; mulch heavily; harvest before roots become overmature |
| Hairy or rough-skinned roots | Excess nitrogen; too-rich soil | Avoid over-fertilizing; use low-nitrogen amendments |
| Carrot fly damage (tunneled roots) | Carrot fly larvae | Fine mesh barrier; row cover; companion plant with onions and leeks |
| Poor germination | Soil too cold or too hot; surface dried out; seeds too old | Plant at correct soil temperature; keep surface moist; use fresh seeds each season |
How to Harvest Carrots
Knowing when and how to harvest is the final and most satisfying step in how to grow carrots.
Most carrot varieties are ready to harvest 60 to 80 days from sowing, depending on variety and growing conditions.
The best indicator of harvest readiness is root diameter at the shoulder - the point where the root meets the soil surface.
Gently push aside a little soil to reveal the top of the root.
For most varieties, a diameter of half to three quarters of an inch at the shoulder indicates a good harvest size.
The color at the shoulder should match the expected variety color - full orange on standard varieties, full purple on colored types, and so on.
Do not wait too long to harvest carrots.
Over-mature carrots develop a woody, pithy texture and may crack or split.
Check roots regularly from the earliest days of the harvest window and pull a test carrot when the size looks right.
The taste test is your best guide - if it is sweet, crisp, and full-flavored, the crop is ready.
To harvest carrots, water the bed the day before to loosen the soil.
Grasp the carrot foliage close to the root crown and pull firmly while gently twisting.
In very compact or clay-heavy soil, use a garden fork to loosen the soil alongside the row before pulling, inserting the fork several inches away from the carrot to avoid spearing the root.
Remove the carrot greens immediately after harvest - within an hour if possible.
The leaves draw moisture from the root very rapidly, causing carrots to go limp and lose their crispness.
Cut or twist the tops off to within half an inch of the root crown. Do not wash carrots before storing - soil helps protect the root surface and extends storage life significantly.
Storing Carrots After Harvest
One of the great practical advantages of growing carrots is that they store exceptionally well compared to most vegetables.
Well-grown, properly stored carrots can remain fresh and crisp for months after harvest - one of the best storage vegetables in the home garden.
The simplest storage method for growing carrots you intend to use within four to six weeks is refrigeration.
Place unwashed carrots in a perforated plastic bag or a container with a slightly damp paper towel in the crisper drawer of the refrigerator.
Stored this way, carrots keep well for four to eight weeks.
For longer storage - particularly for fall-harvested crops intended for winter use - the in-ground method is the most practical approach for most home gardeners.
Leave carrots in the soil after maturity, cover the bed with six to eight inches of straw or shredded leaf mulch before the ground freezes, and harvest through winter as needed.
The soil insulates the roots and the cold actually improves their flavor as starches convert to sugars.
Carrots can be successfully left in the ground this way well into January or February in most climates, and in mild areas through the entire winter.
For bulk storage away from the garden, pack unwashed carrots in boxes or bins layered with just-moist sand, sawdust, or peat moss.
Keep in a cool (32 to 40 degrees Fahrenheit), dark, humid location - a root cellar, unheated basement, or garage. Stored in these conditions, carrots keep well for three to five months.
How to Grow Carrots in Containers
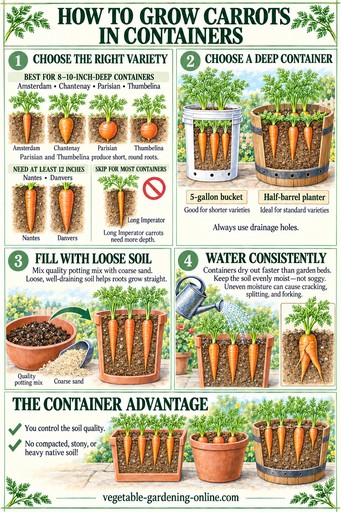 Graphic of growing carrots in containers.
Growing carrots in containers is an excellent solution for gardeners without access to good in-ground soil, and with the right setup it produces outstanding results.
The key is choosing the right variety and the right container depth.
Short or round carrot varieties are the best choice for container growing. Amsterdam, Chantenay, Parisian (a round variety), and Thumbelina (another round type) all produce well in containers as shallow as eight to ten inches.
Standard Nantes and Danvers types need at least twelve inches of depth.
Long Imperator varieties are not suitable for most containers.
An 18-inch pot can hold more carrots than you might expect — often twice as many as gardeners assume at first glance — as long as spacing and soil depth requirements are met.
Use a large, deep container - a five-gallon bucket (about twelve inches deep) works well for shorter varieties.
A half-barrel planter is ideal for standard varieties.
Fill with a mix of quality potting mix and coarse sand for excellent drainage.
Water consistently - containers dry out much faster than in-ground beds and inconsistent moisture causes all the same cracking, splitting, and forking problems as in the ground.
The great advantage of container carrot growing is complete control over soil quality.
The most common cause of carrot failure - compacted, stony, or heavy native soil - is eliminated entirely.
Many gardeners who have struggled with how to grow carrots in their native garden soil find container growing to be a revelation, producing the straight, smooth, beautifully formed roots that eluded them in the ground.
See our complete container vegetable gardening guide for full advice on container growing in general.
Companion Planting for Carrots
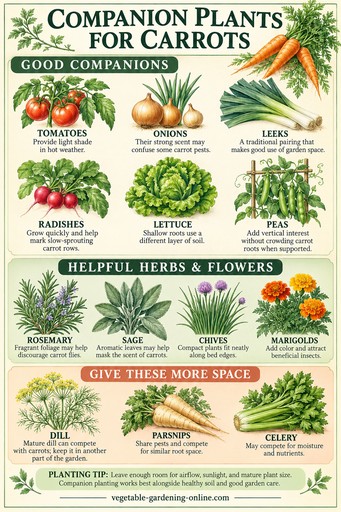 Chart of helpful companion plants for growing carrots.
Companion planting works particularly well for growing carrots because one of the best-documented companion planting relationships in the vegetable garden directly protects them from their primary pest.
Planting carrots alongside onions, leeks, or chives creates a mutual pest-deterrence relationship: the scent of alliums deters carrot fly, and the scent of carrots deters onion fly.
Inter-planting rows of carrots and onions in the same bed is one of the most practical and effective companion planting strategies available in any garden.
Tomatoes are a good companion for growing carrots - they are reported to improve each other's growth, and the tall tomato plants provide some afternoon shade that helps carrots in hot weather.
Rosemary and sage planted near carrots repel carrot fly through their strong scent.
Lettuce and spinach are excellent bed companions for carrots because they fill the surface between carrot rows, suppressing weeds and keeping the soil cool and moist while the slower-growing carrot roots develop below.
Keep carrots away from dill once it has flowered - flowering dill can inhibit carrot growth.
Parsnips and carrots are in the same family and share the same pests - growing them together concentrates carrot fly risk rather than dispersing it. For best results, keep parsnips in a separate bed from carrots.
See our complete companion planting chart for vegetables for the full guide to which crops grow best near carrots and which to keep at a distance.
Frequently Asked Questions About How to Grow Carrots

1. Why are my carrots forked or deformed?
Forked, multi-rooted, or deformed carrots are almost always caused by obstacles in the soil - stones, compaction, large lumps of un-decomposed organic matter, or fresh manure.
The developing taproot divides around anything it cannot grow through.
Thorough soil preparation before planting - removing all stones to at least ten inches, breaking up compaction, and working compost in completely - prevents most forking.
Raised beds with a loose, stone-free growing mix eliminate the problem almost entirely.
2. How long does it take to grow carrots?
Most carrot varieties take 65 to 80 days from seed to harvest, depending on variety and growing conditions.
Fast Amsterdam types can be ready in 58 to 65 days.
Longer Imperator types may take 70 to 80 days.
Fall-grown carrots often take slightly longer than spring carrots because of cooler soil temperatures, but the flavor development in the cool conditions more than compensates for the additional time.
3. Can I grow carrots in clay soil?
Clay soil is genuinely challenging for growing carrots because of its tendency to compact and its poor drainage.
The best solutions are either to choose Chantenay varieties, which are specifically adapted to heavier soils, or to grow in raised beds with an improved soil mix.
Working generous amounts of coarse sand and compost into clay soil before planting helps significantly.
Avoid adding clay breaker products containing gypsum to carrot beds as they can affect root development.
4. Why did my carrots taste bitter?
Bitterness in carrots usually results from one of three causes: growing in high heat conditions (soil temperatures above 80 degrees Fahrenheit), excessive water stress during root development, or harvesting before the roots have fully developed.
Fall-grown carrots that experience frost are almost always sweeter than summer carrots.
Consistent watering and planting at the right time of year - spring or early fall rather than midsummer - prevents most bitterness.
5. How do I prevent carrot fly?
The most reliable prevention for carrot fly when growing carrots is a physical barrier - fine mesh insect netting placed over the bed from sowing to harvest.
Carrot fly navigate by scent at low height, so a barrier 24 inches or taller around the bed edges is very effective.
Companion planting with onions and leeks is a well-documented deterrent.
Avoid thinning carrots in the evening when carrot fly are most active, and bury or dispose of thinned seedlings rather than leaving them on the soil where their scent attracts flies.
More Expert Guidance on How to Grow Carrots
For additional research-based guidance on growing carrots at home, the University of Illinois Extension offers a detailed guide covering soil preparation, spacing, thinning, harvest timing, and storage — along with answers to common problems like forked roots and green shoulders.
University of Illinois Extension — Carrots
More Vegetable Growing Guides

- Growing Vegetables — complete hub for growing all vegetables at home

Recent Articles


-
How to Grow Cabbage
Sep 15, 26 12:33 PM
 How to Grow Cabbage: The Complete Guide from Seed to Harvest. This complete guide covers everything you need to know about how to grow cabbage.
 -
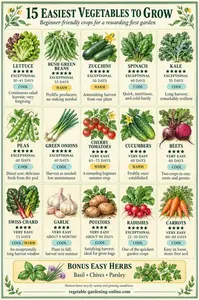
Easiest Vegetables to Grow: 15 Foolproof Crops for Beginners
Sep 15, 26 09:24 AM
 Easiest vegetables to grow for beginners - with advice on what makes each one easy, how to get started, and which vegetables are harder than they look.
 -
How to Grow Green Beans
Sep 14, 26 07:53 PM
 How to Grow Green Beans: The Complete Guide to Bush and Pole Beans. Green beans are one of the most forgiving crops a beginner can choose.
 -
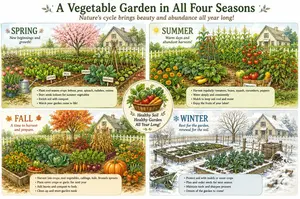
Seasonal Vegetable Garden
Sep 14, 26 05:38 PM
 Seasonal Vegetable Garden — Growing Food Through Every Season
 -
Overwintering Vegetables: Fall-Planted Crops for Early Spring Harvest
Sep 14, 26 05:35 PM
 Learn about overwintering vegetables like garlic, fava beans, and onions, planted in fall to sit through winter and reward you with an early spring harvest.
 -
Free Vegetable Garden Journal— Printable Downloads for Home Gardeners
Sep 14, 26 01:51 PM
 Download our free Vegetable Garden Journal — choose a full 16-page version or simpler 7-page journal. Track planting, harvest, & garden notes season by season.
 -
Free Vegetable Garden Cut and Paste Activities for Kids Ages 5-7
Sep 12, 26 09:13 PM
 Free printable vegetable garden cut and paste activities for kids ages 5-7. Build your own garden, match seeds to plants, and learn what grows where.