How to Grow Potatoes:
The Complete Guide from Seed Potato to Harvest
 ★ Save
Potatoes are the treasure hunt of the vegetable garden. Nothing compares to pushing a garden fork into the soil and turning up a cluster of clean, freshly grown potatoes. Here's how to grow potatoes, from choosing seed potatoes to curing your harvest.
Growing your own also opens up a world of varieties you'll never find at the store: fingerlings, red and purple heirlooms, waxy salad potatoes, and buttery yellow kinds.
Potatoes are one of the most productive crops a home gardener can grow. According to the University of Maine Cooperative Extension, a pound of seed potatoes can produce ten pounds or more in good conditions.
This guide covers everything from choosing seed potatoes to curing and storing your harvest, whether you have a big in-ground garden, a few raised beds, or a sunny patio with room for a grow bag or two.
From My Garden
Our family usually didn't grow our own potatoes, but I remember one year when we had a large plot of them, and I helped with the harvest. It was hard to get them out of the ground without piercing them with the pitchfork. A damaged potato wouldn't keep in storage, so any we speared had to be eaten right away.
Years later, I tried growing potatoes in a large garbage can. I carefully set the seed potatoes on a base of soil in the bottom and covered them. As the plants grew, I kept adding soil until the plants and soil reached the top of the can.
At harvest time, my husband and my father were on hand. My husband brought a wheelbarrow, and I took photographs. We found a good-sized potato right away, and our hopes ran high! Then we found several potatoes one to two inches across. Then nothing.
We didn't get many potatoes, but we did get a good laugh.
Charlotte
When should you plant potatoes?
Type in your zip code, and our free Planting Calendar gives you the dates for potatoes and every other vegetable in your garden. Our Zone Finder shows your frost dates, too.
Open the Planting CalendarOn This Page
Choosing Potato Varieties
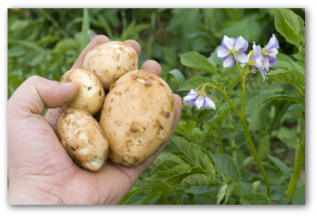
Home gardeners can choose from hundreds of potato varieties, with very different flavors, textures, and colors. Commercial growers raise just a handful, chosen for high yields and long shelf life. Trying a few unusual kinds is one of the joys of learning how to grow potatoes at home.
Potatoes are sorted by how long they take to mature. This matters most in short-season northern gardens, where late varieties may not finish before frost.
- Early-season (70 to 90 days): The first new potatoes of summer. Best for northern gardens, containers, and grow bags. Try Red Norland, Yukon Gold, or Irish Cobbler.
- Mid-season (90 to 110 days): The widest choice. Red Pontiac, Kennebec, and Purple Majesty are reliable and full of flavor.
- Late-season (110 to 130 days): The biggest yields and the best keepers for winter. Russet Burbank, the classic baking potato, and German Butterball are favorites if your season is long enough.
Potato varieties for the home garden
| Variety | Season | Days | Flesh | Best use |
|---|---|---|---|---|
| Red Norland | Early | 70-90 | White | New potatoes, boiling, salads |
| Yukon Gold | Early-mid | 80-90 | Yellow | All-purpose, mashing, roasting |
| Purple Majesty | Mid | 85-95 | Purple | Boiling, salads, colorful dishes |
| Red Pontiac | Mid | 90-100 | White | Boiling, mashing, stores well |
| Kennebec | Mid-late | 90-110 | White | All-purpose, fries, long storage |
| German Butterball | Mid-late | 100-110 | Deep yellow | Roasting, rich buttery flavor |
| French Fingerling | Mid-late | 90-110 | Yellow, pink | Roasting, salads |
| Russet Burbank | Late | 110-130 | White, dry | Baking, fries; needs deep, loose soil |
Seed Potatoes: What They Are and Why They Matter
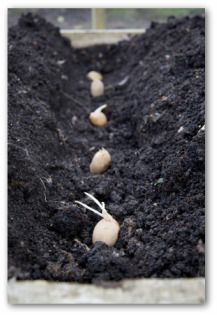
Seed potatoes are not seeds. They are small potatoes, or pieces of potatoes, grown and certified free of the diseases that affect the potato family. Buy them from a garden center or seed company each spring. Starting with certified seed potatoes is the safest way to learn how to grow potatoes.
Grocery store potatoes are often treated to keep them from sprouting, and they can bring disease into your garden. The treatment does wear off in time, which is why the potatoes in my cupboard always seem to sprout anyway! Still, certified seed potatoes cost little and give you the best start.
I buy the smallest seed potatoes I can find, about the size of an egg, so I can plant them whole. There's no cutting and no waiting for the pieces to dry.
To cut larger seed potatoes, make pieces with one or two eyes each (the small dimples where sprouts grow). Let the cut pieces dry and form a skin for a day or two before planting, so they don't rot in the ground.
For a head start, "chit" your seed potatoes. Set them in an egg carton or shallow tray with most of the eyes facing up, in a cool, bright room out of direct sun, for three to four weeks before planting. Short, sturdy green sprouts will form, and the plants come up faster once planted.
When and Where to Plant Potatoes

Potatoes are a cool-season crop. Plant seed potatoes two to four weeks before your last spring frost, once the soil has warmed to at least 45°F. Cool soil and cool weather are central to how to grow potatoes well.
Potato planting dates by zone
Find your zone below. Don't know it? Our free Zone Finder looks it up from your zip code.
| Your zone | Average last spring frost | Plant seed potatoes | First new potatoes | Dig early varieties |
|---|---|---|---|---|
| Zone 3 | Late May | Late April to mid May | Late June to late July | Late July to late August |
| Zone 4 | Mid May | Mid April to early May | Mid June to mid July | Mid July to mid August |
| Zone 5 | Early May | Early to late April | Early June to early July | Early July to early August |
| Zone 6 | Mid to late April | Late March to mid April | Late May to mid June | Late June to late July |
| Zone 7 | Early April | Early to late March | Early May to early June | Early June to early July |
| Zone 8 | Mid to late March | Mid February to mid March | Mid April to mid May | Mid May to late June |
| Zone 9 | Mid February to early March | Mid January to mid February | Late March to late April | Mid April to late May |
These are average dates. Wet, cold soil rots seed potatoes, so wait a few days if your ground is still soggy. New potatoes are ready about two to three weeks after the plants bloom. Mid- and late-season varieties come later, and they need to finish before your first fall frost.
In zones 8 and 9, many gardeners plant a second crop in late summer for a fall harvest, using small whole seed potatoes. In zones 10 and 11, plant in fall or winter.
The young plants are tender. If frost is forecast after the sprouts are up, cover them overnight with a frost blanket, a thick layer of straw, or newspaper, and uncover them in the morning. Move containers into a garage or shed for the night.
Choosing the spot
Choose a spot in full sun, six to eight hours a day, with good air flow and good drainage. Avoid low spots where cold air and water collect.
Rotate your potato bed every year. Don't plant potatoes where potatoes, tomatoes, peppers, or eggplant grew in the last two or three years. They are all in the nightshade family and share the same soil diseases.
Preparing the Soil for Potatoes

Potatoes form underground, so they need loose, deep soil to grow large and smooth. In heavy clay or rocky ground they come out small and misshapen. Loose soil is the foundation of how to grow potatoes that come out large and smooth.
Dig or till the bed at least 12 inches deep, remove stones, and work in two to three inches of well-aged compost. Don't use fresh manure. It pushes leafy growth instead of potatoes and makes scab more likely.
Potatoes like slightly acid soil, with a pH of about 5.0 to 6.5. That acidity helps prevent common scab, the rough, corky patches on potato skins. Don't add lime to a potato bed. Our vegetable garden soil guide explains how to test and improve your soil.
If your native soil is heavy or poorly drained, grow potatoes in a raised bed filled with loose soil and compost, or in grow bags (see the container section below).
How to Plant Potatoes

- Dig a trench or holes four to six inches deep. Set the seed potatoes in the bottom with the sprouts or eyes facing up.
- Space them 12 inches apart for early varieties and 15 inches apart for larger late varieties. Leave two to three feet between rows, so you have room to hill soil around the plants later.
- Cover them with three to four inches of soil. Don't bury them deeper at first. Planting too deep slows the sprouts, and the extra soil comes later, when you hill.
- Water once to settle the soil, then water only if the soil turns dry until the shoots appear. Potatoes like cool, moist soil, not wet. Sprouts usually show in two to four weeks, faster in warm soil.
Hilling Potatoes
 ★ Save
If you remember one thing about how to grow potatoes, make it hilling. Hilling means drawing soil up around the stems as the plants grow, and it matters for two reasons.
- More potatoes: Potatoes form on underground stems. The more stem you bury, the more of those stems form, and the more potatoes you dig.
- No green potatoes: Potatoes that see daylight turn green and develop solanine, a bitter, mildly toxic compound. Keeping them covered prevents it.
Start hilling when the plants are 8 to 10 inches tall. Use a hoe to pull soil up around each plant, leaving the top four to six inches of leaves showing. Repeat every two to three weeks until the hills are 8 to 12 inches high or the plants begin to flower. It's the most hands-on part of how to grow potatoes.
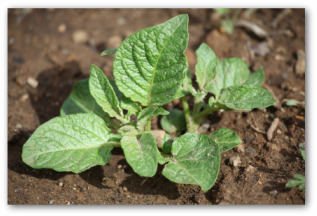
Straw works well for the top layers. It's lighter than soil, holds moisture, and makes harvest easier. In containers and grow bags you "hill" by adding more soil as the plants grow. Straw is an easy way to learn how to grow potatoes with clean, easy-to-dig tubers.
Watering and Feeding Potatoes
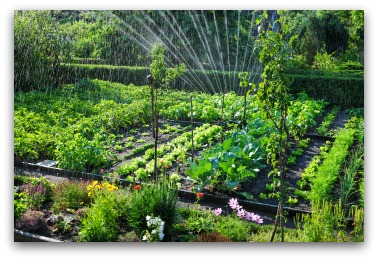
Steady moisture is the secret to smooth, well-shaped potatoes. Potatoes need about one to two inches of water a week, from rain or the hose. Even moisture is a big part of how to grow potatoes without cracks or knobs.
The most important time is from flowering on, when the potatoes are forming and growing. A dry spell then, followed by a heavy soaking, causes hollow centers, cracks, and knobby potatoes. Water deeply and evenly, and spread straw over the hills to keep the soil moist. In hot weather, containers may need water every day.
Feed lightly. Compost worked in at planting is enough for most gardens. You can side-dress with a balanced fertilizer when the plants are about eight inches tall. Once they flower, stop. Too much nitrogen makes big leafy tops and fewer potatoes.
When the tops begin to yellow and die back, cut back on water. This helps the skins firm up for harvest.
How to Grow Potatoes in Containers, Grow Bags, and Straw

No garden bed? Potatoes grow beautifully in containers on a patio, porch, or balcony, and children love the harvest. This is how to grow potatoes when you have no garden bed at all.
Choose a container that holds at least 10 gallons; 15 to 20 is better. Fabric grow bags, half barrels, and clean plastic trash cans all work. Drill drainage holes in the bottom of a trash can, and pick one on wheels if you'd like to move it around.
Early and mid-season varieties such as Yukon Gold, Red Norland, and fingerlings do best in containers.
Wider beats taller. Many potato varieties form most of their potatoes in a layer near the seed potato, not all the way up the stem. Piling soil higher in a tall can doesn't always mean more potatoes. A wide 15- to 20-gallon grow bag usually does better.
 ★ Save
How to grow potatoes in grow bags: step by step
| Stage | What to do | Notes |
|---|---|---|
| Start | Roll down the bag sides. Add 6 inches of potting mix with compost, set 2 or 3 seed potatoes on top, and cover with 4 inches of mix. | Use a 15- to 20-gallon bag. |
| Plants 6 to 8 inches tall | Add 4 more inches of mix, leaving the top 4 inches of leaves showing. | Unroll the bag sides as the soil rises. |
| Plants 12 to 14 inches tall | Add another 4 inches of mix. | Keep 4 to 6 inches of leaves showing. |
| Fully grown | Keep the mix evenly moist; feed lightly if needed. | The bag should be nearly full. The plants will flower, then die back. |
| Tops yellowing | Water less. Wait 2 weeks after the tops die back completely. | The skins firm up in the bag. |
| Harvest | Tip the bag onto a tarp and sort through the mix by hand. | Enjoy the treasure hunt! Container potatoes come out clean and smooth. |
Watch: my garbage can potato harvest
Here is the harvest from my garbage can potato experiment. One good-sized potato, a few small ones, and a lot of laughs!
Growing potatoes in straw
 ★ Save
Loosen the soil, lay the seed potatoes on the surface, and cover them with about six inches of loose straw. As the shoots come through, keep adding straw around the stems. You can slip your hand under the straw to steal a few new potatoes, and at harvest you simply pull the straw back. No digging, and no potatoes cut by the fork!
Old tires were once popular for this, but many extension services now advise against growing food in tires, since they can leach zinc and other chemicals into the soil. A grow bag or a wire cage lined with straw is a safer choice.
Containers dry out fast, so check them daily in hot weather. At the end of the season, scrub containers with a 1:10 bleach-and-water solution so they're clean for next year.
Common Problems When Growing Potatoes

Most potato problems can be prevented once you know what causes them. Prevention is the best part of how to grow potatoes with few problems.
Blight is the most serious. Late blight, the disease behind the Irish Potato Famine, is caused by a water mold, not a true fungus. It makes dark, water-soaked patches on the leaves and spreads fast in cool, wet weather. Early blight makes brown spots with rings like a target.
To prevent both, grow resistant varieties such as Kennebec, Elba, or Defender, rotate your beds, space plants for good air flow, and water at the base, not over the leaves. If blight appears, pull and throw away (don't compost) the affected plants. A copper spray can slow its spread.
Common scab causes rough, corky patches on the skin. The potatoes are still fine to eat once peeled. Keep the soil slightly acid and evenly moist, and skip the lime and fresh manure.
Colorado potato beetles are the worst insect pest in much of the US. The striped adults and their red-orange larvae can strip a plant fast. Hand-pick them into a jar of soapy water, and crush the orange egg clusters under the leaves. Row cover keeps them off young plants, and spinosad is an organic spray for heavy infestations. Hunting potato beetles is a good job for young helpers!
Common potato problems and solutions
| Problem | Cause | What to do |
|---|---|---|
| Late blight: dark, water-soaked patches on leaves | A water mold that spreads in cool, wet weather | Resistant varieties, rotation, good air flow; remove sick plants; copper spray to slow it |
| Early blight: brown spots with rings | A fungus in the soil and old plant debris | Rotation, mulch, water at the base, clean up debris |
| Common scab: rough, corky patches on skins | Alkaline soil, fresh manure, dry spells as potatoes form | Keep pH below 6.5; no lime or fresh manure; even watering |
| Green potatoes | Potatoes exposed to light | Hill well; store in the dark |
| Hollow centers, cracks, knobs | Uneven watering: drought, then heavy water | Water deeply and evenly; mulch |
| Colorado potato beetle | Striped beetles and red-orange larvae eat the leaves | Hand-pick beetles, larvae, and orange egg clusters; row cover; spinosad |
| Seed potatoes rot | Soil too cold or wet; freshly cut pieces | Plant in soil 45°F or warmer; let cut pieces dry first |
How to Harvest Potatoes
 ★ Save
There are two potato harvests: new potatoes in early summer, and mature potatoes later on. Harvest is the fun part of how to grow potatoes, especially for kids. Both are worth waiting for when you learn how to grow potatoes.
New potatoes are small and tender, with thin skins and a sweet flavor. They are ready about two to three weeks after the plants bloom. Gently push the soil (or straw) aside with your hand, take a few from the edge of each hill, and cover the rest so they keep growing. New potatoes don't keep, so enjoy them within a few days.
Mature potatoes are ready when the tops turn yellow and die back. Stop watering, then wait two to three weeks before digging. The skins thicken in the ground during that time, which helps the potatoes keep in storage.
Dig on a dry day. Pull the dead vines and add them to the compost pile, unless they had blight. Potatoes spread out from the plant, so push your garden fork into the soil about a foot from the center of the row and lift gently toward the plant. A speared or bruised potato will rot in storage, so eat those first.
Let the potatoes dry on the soil for an hour or two, then move them out of the sun. Even a few days of light will turn them green. Pick up every last one, or they'll sprout as volunteers next spring.
Early varieties don't store long, so dig only what you need for the kitchen. Leave the late varieties for September or October and winter storage.
Curing and Storing Potatoes After Harvest

Curing toughens the skins and heals small nicks from digging, so your potatoes keep for months. Don't wash them first. Brush off loose soil and spread them out in a single layer in a dark, airy place at 50 to 60°F, such as a garage, basement, or shed, for about two weeks. Curing is the last step in how to grow potatoes that keep through winter.
After curing, store potatoes somewhere dark, cool, and slightly humid. About 40 to 45°F is ideal. A root cellar is perfect, and a cool basement or an unheated (but frost-free) garage works well too. Use baskets, burlap sacks, or open mesh bags so air can move around them.
Keep potatoes out of the refrigerator. In the cold, the starch turns to sugar, so they taste sweet and brown too fast when cooked. Keep them away from light, which turns them green, and away from apples and onions, which make them sprout sooner.
Check stored potatoes every few weeks and take out any that turn soft or start to rot, before they spoil their neighbors. Late varieties like Kennebec, Russet Burbank, and Red Pontiac keep the longest, often into early spring.
Potato Growing Questions
- How long does it take to grow potatoes?
- Early varieties are ready in about 70 to 90 days from planting, mid-season varieties in 90 to 110 days, and late varieties in 110 to 130 days. You can dig a few new potatoes about two to three weeks after the plants bloom.
- When should I plant potatoes?
- Two to four weeks before your last spring frost, once the soil reaches 45°F. See the planting dates by zone above.
- How many potatoes does one plant produce?
- A healthy plant usually gives two to five pounds, and sometimes more with good hilling and steady watering. Or think of it this way: a pound of seed potatoes can grow ten pounds or more.
- Can I eat green potatoes?
- Cut away small green spots generously; the rest of the potato is fine. Throw away potatoes that are green all over, or that taste bitter. Hilling well and storing potatoes in the dark prevents greening.
- My potato plant grew little green "tomatoes." Can we eat them?
- No. Some potato plants make small green berries after they bloom. They look like cherry tomatoes, but they are poisonous, so pick them off and keep them away from children. They don't hurt the potatoes underground.
- Can I save my own seed potatoes?
- Yes. Save healthy, medium-sized potatoes from disease-free plants, store them as usual, and plant them the next spring. Diseases can build up over the years, though, so start fresh with certified seed potatoes every few seasons.
- Is it better to grow potatoes in raised beds or in the ground?
- Raised beds and grow bags are easier for most home gardens. The loose soil grows smooth potatoes, drains well, and makes hilling and digging simple. In-ground beds work well too, if your soil is loose and deep.
- How do I grow potatoes in a small space?
- Use a 15- to 20-gallon grow bag or container on a sunny patio or balcony, and plant an early or mid-season variety. See the containers, grow bags, and straw section above.
For more research-based reading, see the University of Maine Cooperative Extension's guide, Growing Potatoes in the Home Garden.
More Vegetable Growing Guides
My short garden email, Get the Dirt, comes Saturday mornings.
Sign Up for My Free Newsletter